Dive into Swimsuits

Swimwear week- bloggers designers Talented bloggers  you've never made a swimsuitPrizes!

It’s my turn on the “Dive into Swimsuits” blog tour hosted by Coles Creations! You can find all the blog posts and enter to win prizes over at Cole’s page!

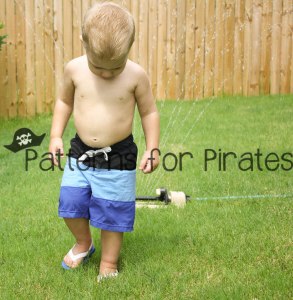
I love making my little guy swim trunks, they’re quick and easy and so much more comfortable then the store bought with those itchy netting panties (WHO thought those were the answer???)

10488311_10152282667058214_9048176137652269596_n10509702_10152282667323214_5187630289628509110_n

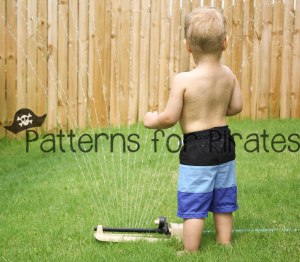
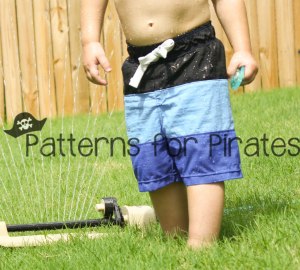
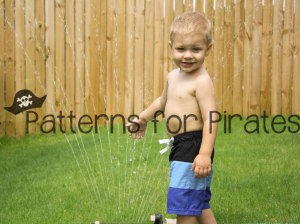
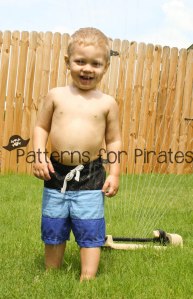
These are my pattern, the Swashbuckler Swim Trunks and my FAVORITE feature is the boxer brief style lining pieces…SO much better then those netting panties! I would always cut them out of his before he was potty trained. Then once he was potty trained I thought he needed some lining and support under there, but no way were those netting panties the answer!

I have a great picture of the boxer brief lining piece, BUT for some reason my wordpress wont upload it today!!!! 😦

IMG_5458IMG_5473

I use either swim lining or a swimsuit fabric (nylon spandex). I love to coordinate the lining piece to a matching rash guard! Of course I don’t have any finished modeled pictures of that (and no one else will likely see the lining piece) but I love it!

I get asked a lot where to find the fabric for swim trunks.  You can grab a remnant or scrap piece of swim fabric or lining for the boxer brief lining again, you’ll want a nylon spandex 4 way stretch swim knit.  For the main shorts you can use “boardshort fabric” as some shop labels it (top skull print was labeled this from Funkaliicious Fabrics), “woven supplex” is a thinner version (great for super hot climates- the tricolor here is woven supplex from Chez Ami, who have since gone out of business.) I also know the Fabric Fairy usually has some in stock as well as Rockywoods Outdoor Fabric also carries it.

IMG_5461IMG_5484

And of course sewing always provides you with the ability to give your little one the perfect fit if they need a different width to height ratio and don’t fit into the “average” sizes.

IMG_5465

I hope you dive in this summer and make some swimsuits! Have fun!

Designer’s Swap

I hardly ever have time to sew up other designer’s patterns, but I’m always wishing I had more time to!

So, I loved the idea of this designer swap! I could sign up and have a deadline to “make” me finish 😉

10382167_813201762096592_3349078359874250572_n

Here is a link to the original announcement along with sales by the designers that participated (pssst Patterns for Pirates has a coupon code there! 😉 )

We are also doing a giveaway, rafflecopter posted at the bottom of the page! 

I got assigned the California dress by EYMM, which happened to be one of my very favorite designs in Kymy’s collection!  And she put it on sale-  code: californiasummer will save 25% off the Women’s California or Girl’s California or the California Bundle good April 20 through 27 at 11:59pm PDT at http://www.eymm.com.  It’s a simple dress you could do in a ton of different looks/fabrics and wear all spring, summer, and fall long! She always has a ton of options that wrap up in a quick easy sew!

il_570xN.626626220_dx7s il_570xN.626736839_as12

I went with two fronts so I didn’t have to worry about bra straps 😉 These suckers aren’t staying up in a strapless anymore!

11174422_10100306631027707_5979736855787993_o

I really wanted to somehow squeeze out a maxi out of my 2 yds, although the pattern called for 3.5 yds.  So I had to do some modifying! I spliced the pattern along the casing line and added a little to the front bodice only to make up for my chest size.  Otherwise this style always ends up blousing in the back and not in the front on me! I’ve always thought it was one of the easiest styles to alter for a full bust!

11136228_10100306631002757_6947367550955224954_o11154933_10100306630638487_729926160472901635_o

I also cut the skirt pieces much less full to accommodate my tiny yardage! I knew it would be too tight to comfortably walk in, so I did slits up both side seams to the “above knee cut line” on the pattern. The lighting here shows off a little more then usually, lol… the fabric isn’t see through at all in person!

11162037_10100306630369027_6457652057315584012_o11174634_10100306630498767_6789779450964393256_o

I love this style dress for the spring, summer and fall… so easy to throw on and look stylish! I can chase my little guy around in it without worrying about showing anything 🙂

11174256_10100306630104557_3239395190234372115_o 11146430_10100306630099567_3671446381715494936_o

I had a great time sewing this up and plan on wearing it lots!

Giveaway:

https://www.rafflecopter.com/rafl/display/924f94de33/

Boys Can Wear Pink- the Handmade Boys Series

10403212_10203606554227703_5404214825045129306_n

I ❤ the Handmade Boy Blog! Kelly makes the CUTEST clothes for her son and daughters (and sometimes even herself when I can talk her into it 😉 ) She is the sweetest; always going above and beyond for me testing patterns and even trying to help me with photo tips!  So when she told me she was doing her first series I could never turn her down!

Boys Can Wear Pink!

10373803_10203669746407468_16103805812955764_n

To be honest, I’ve never put my little guy in pink before… I’m not a huge pink lover…I tend to always go with greys and blues for myself, my husband and for little guy! Boring, I know… if you could see my fabric stash, it is pretty dull! I also tend to dress him like a little macho man in camo, dinosaur, anything you would label “very boyish”…So, this really pulled me out of my comfort zone to design and make something for him with pink!

I decided to go with a classic “pirate/sailor” look and theme to help me get inspired…since I love this look and theme! I went with a white and pink stripe I got from my local Hobby Lobby, in their spring collection. In person the pink is almost neon.

IMG_1477IMG_1529


I knew I wanted the oh so classic “Mom” heart tattoo on it as well (just pink instead of red).  I struggled on placement! But in the end I went with the shoulder, where a tattoo would be and I’m so happy with it!

IMG_1569 IMG_1527 IMG_1483 IMG_1416

I added an iron on transfer of a black anchor to the front right side to help fill and even it out overall.

IMG_1423 IMG_1455 IMG_1521 IMG_1544 IMG_1550

I paired it with his Cpt. Comfort Jeans that are distressed and bribed him to wear the black tennis shoes (instead of his Woody boots that he wears EVERY DAY!!!) It took a piece of candy and going outside to play to get them on!

IMG_1570 IMG_1464  IMG_1461

His hair… oh my… he woke up with the most wild hair ever that day… So I tried to put a little gel in it to calm it down and it didn’t help much! But it kind of fits the sailor look right? Wind blown? We’ll go with that 😉

IMG_1452 IMG_1434 IMG_1429IMG_1461

In the end I love the bright colors on him… it fits his wild, rambunctious personality so much better then the greys I usually go for! (Although, I tend to be quiet and shy…so I’ll stick with my muted tones for myself 😉 ) I am going to try to add more bright colors into his wardrobe for sure! Thank you Kelly for having me in your series!! ❤

IMG_1634IMG_1655IMG_1675 IMG_1670   IMG_1635  IMG_1621  IMG_1482 IMG_1462

Now you can participate too!

10451056_10203685980053299_4539772564669910279_n

Prizes:

One yard of http://www.mabelmadison.com/pit-stop-pink-stenzo-poplin.html Stop Poplin in pink http://www.mabelmadison.com/
$25 gift certificate, plus a surprise fat quarter from https://www.etsy.com/people/phatquarters?ref=pr_profile
One yard of solid cotton/lycra & one yard of coordinating fabric from  https://www.facebook.com/pages/Purpleseamstress-Fabric/135198749843668
One pattern of choice from http://www.paisleyroots.com/
$20 store credit from http://peekaboopatternshop.com/
One pattern of choice from Patterns for Pirates http://www.craftsy.com/user/3301275/pattern-store
One pattern of choice from  http://www.welcometothemousehouse.com/shop

Bottoms Up Pants Pattern from http://ifonlytheywouldnap.net/

One Pattern of choice from http://www.titchythreads.com/patterns

Tips and tricks of upscyling Jeans!

Making jeans can be a little intimidating for some… and we’ve already had a post here about making jeans look more like store bought jeans with details like top-stitching thread and distressing.

But, a really easy way to get your jeans looking professional is to use an old pair that an adult is throwing/giving away! This means a lot less work for you distressing and top-stitching if you’re smart about laying out your pattern pieces! So here it goes…my tips on using pre-existing jeans:

1- Making a few cuts along the seams can really make cutting your pieces much easier! I like to cut along the inside legs/crotch, cut off the waistband and beltloops, and the back pockets.

IMG_9003IMG_9001 IMG_9004

2- Be cautious about distressed/washed jeans and laying out your pattern pieces… meaning, if your jeans have a very obvious fade/wash/distress pattern on them then you need to make sure you like where it will be placed and that it will match when you sew up your jeans. For this pair, I wanted the distressed area of the original jeans, so I laid my patterns around that.  Notice that my two pieces are very close to the same area horizontally, and that the back yoke is placed above the back piece.  All of this will ensure that the distressing and wash look natural on my finished jeans.

IMG_7758

You can also use the original hem line if you prefer to get that instead. Remember to account for hem allowance. I did that with this pair, because my jeans didn’t have a very noticeable distressing.

IMG_9000

Use the back pockets when cutting your new pockets, Remember to account for the hem allowance at the top.

IMG_9005

If you’d like to use the waistband and belt loops you can…. but warning, unpicking those belt loop stiches is not fun 😉

If you pattern calls for elastic in the waistband, like my Cpt. Comfort Jeans, then you will have to cut a slit on the wrong side of the waistband to slip your elastic through- I just use a wide zigzag to mend the slit after (I hide the zigzag stitches behind a belt loop!).  Make sure when overlapping that you line up your jeans button and button hole, you can see here on mine they overlapped much more then the pattern called for.  Then you will tack down the bottom of the belt loops 🙂

IMG_9006IMG_9012IMG_9213

3- Now that you have your pieces cut you will continue to sew them just like the pattern calls for  matching the store bought top-stitching thread as best you can. And although they have a wash and distressing, I STILL distress along the way! That way my finished jeans will have the distressing where store bought jeans do, like along pocket lines.

IMG_7260 IMG_9009

IMG_9010

Now you have a great fitting (no plumbers crack!) pair of jeans that cost you nothing but the thread and time ❤ and plus they look amazing!

IMG_9218   IMG_9422IMG_9403

Make ready to wear looking jeans!

Jeans can be an intimidating sewing task, but they really aren’t that difficult and it is so great to have well fitting jeans for you or your little ones! No more plumbers crack when bending down!!!!! 😉

IMG_9403

With my recent release of the Cpt. Comfort Jeans I wanted to post about how to distress your new denim to look more like ready to wear jeans! I personally LOVE the distressed look! Although a super clean dark denim can look nice as a “dressy” pair of jeans like here:

_DSC4859

But for everyday, I just love the little distressed look… something about looking like Daddy gets me every time with my little guy!

So, lets get started on those great store bought look jeans!

You really MUST use a top-stitching thread for all your top-stiching if you want store bought look… I scoffed at my Mom the first time she told me it was a must… BUT she was right, like always!!

IMG_7260

You will use this heavier/thicker weight top-stitching thread in the top only and for top-stitching only. You will use regular thread in the bobbin and for all seams sewing the jeans together– yep, you have to rethread a lot ;). But it is absolutely worth it if you want ready to wear looking jeans! I promise!

You will also NEED a bigger needle designed for heavy weight fabric like denim or you will be breaking needles on those thick belt loops!… here is a single and double needle:

IMG_7259

Now, I only have one machine, so there is A LOT of switching threads and needles if I use the double needle. So, I will often just sew two lines with my single needle instead of switching to my double needle 😉

Now for the distressing, you will need some sandpaper! To be honest, I’m not sure the BEST kind of sandpaper to use… I asked my husband if he had some and used whatever he handed me 😉 Here is a shot of the kind I happen to use!

IMG_9008

The trick to distressing your denim is to do at WHILE you’re sewing the jeans! If you try to do it before it’s hard to gauge where the distressing needs to be. If you do if after you’ve top-stitched them then you will be breaking your top-stitching threads (ask me how I know that one 😉 ) see left top pocket with it’s broken threads :/ oops!

IMG_9422

So, I suggest sewing the jeans together with your normal thread, then distressing with sandpaper before you top-stitch. Here is my patch pocket sewn, turned right sides out, and distressed along the edges (and any other places I fancied at the moment). Then I top-stitched.

IMG_9010

Some areas are harder to distress before topstitching like back pockets, belt loops, any piece that you are top-stitching closed or onto the jean.  But I still follow the same steps.  I just fold and press, distress, then top-stitch onto the back piece.

IMG_8998

So have fun with a little distressing or A LOT! lol! I like a lot 😉 I end up with a mound of blue fuzz all my sewing room by the time I’m done!

Last is the button! I love to use “real” jeans buttons- and honestly, I always have been lucky enough to take them from my loving mother’s stash! But they are very easy to put on, just line up the two parts and hammer away! Yep, you’ll have sandpaper and a hammer in your sewing room for jeans!!

I’ve always used snaps, which are very common on ready to wear for younger children 🙂

IMG_9000 IMG_9218 IMG_9245

Patterns for Pirates and Girl Charlee- a match made in heaven!

girl charlee promo

My love for drafting great modern pdf sewing patterns for women has found a great match…Girl Charlee Fabrics!

We’re both all about modern, trendy looks! And like Girl Charlee I mostly design for knit fabrics 🙂

Here is the first Girl Charlee sponsored pattern of mine: the Everyday Elegance Top

listing pictures1

This top is perfect for everyday wear with a great put together look! The loose flowy fit is so comfortable and flattering for women of all ages and shapes! Speaking of shapes, this pattern is from XXS-XXXL… if you’d like to see it in all sizes head over to my group where you can find every size modeled and what fabric they used! https://www.facebook.com/groups/1489835597930083/

I’m wearing Girl Charlee peach skin on the cover photo, this is a soft woven fabric with a lovely drape.  It is one of the easiest drapey wovens I’ve ever worked with, because it’s not slippery! Plus! 🙂

Here I am in another Girl Charlee fabric- their chiffon.

1 (2) 1 (9)

Now SOME chiffons can be more difficult to work with, but this navy and white dot wasn’t! Although it is still chiffon, so it doesn’t like to hold a press well, it wasn’t super slippery while sewing. I LOVE this one! The super soft drape is a perfect match for this loose top!

This top can also be made is a knit fabric, which Girl Charlee is best known for! Here is my LOVELY sister in an all knit Everyday Elegance Top:

3 (1) 3 (2)

Isn’t she beautiful? Made in a soft knit, you can’t beat the comfort level of this shirt! And yet, you still look dressed nice, trendy, and even professional enough to go to work, church or out for some fun!

Some of the details on the shirt are the V front and rounded collar here:

1 (5) a (3)

That’s right ladies, no tricky placket or buttons for you to get frustrated with! All the techniques on this top are easy and quick!

The sleeves have a small gather at the shoulder seam:

a (8)

That means all your ease is in that gather–no tricky easing in the set in sleeves! YAY! Again, easy techniques!

The button tabs add such a cute and trendy look to the 3/4 sleeve, so you can wear this top year round!

4 (1)a (7)

And the longer tunic length with curved hem is perfect for pairing with leggings, skinny jeans or even your favorite work slacks! No more worrying about anything hanging out when you bend over 😉

a (1) a (4)

And last the back yoke is perfect to play with fabric combos, and the back pleat gives it the extra flowy looseness you need in the back 😉

2 (5) 5 (1)5 (2) a (6)

Not so into loose blouses? That’s okay! This pattern also comes with a quick and easy belt you can tie around at empire, waist or hips-whichever is most flattering for your figure!

1 (6) 1 (11)  9 (1)  b (5)10648830_10205104950368558_2047112295619283852_o

Oh… look at that baby bump looking oh so adorable in this non-modified knit Everyday Elegance Top!

So… since Patterns for Pirates and Girl Charlee make such a great pair we decided not only to work together with pattern sponsorship, but Girl Charlee will also be the first and only other place besides Craftsy and Etsy where you can buy a Patterns for Pirates pattern! To kick off our partnership we’re running a CONTEST AND GIVEAWAY! 1 (1)contest

Come join my facebook group to enter your change to win 3 Patterns for Pirates patterns of your choice AND a $25 gift card to Girl Charlee!

To enter you can share any items made from a Patterns for Pirates pattern WITH Girl Charlee fabrics in the designated contest album! It can be an item you’ve sewn previously or you can order now and make one to enter with! Don’t worry, you have 4 weeks to order, create, and share to win!

Winner will be chosen by all of us here at Mother Sews Best for our pick of the best pairing of fabric to pattern! There will also be one random winner for 2nd place for 1 Patterns for Pirates Pattern of choice.

Full BOOTY Adjustment tips

So in my post about the Greenstyle Taylor Shorts I made myself here … I mentioned I did a “full butt adjustment”.. well because I have a FULL butt 😉

IMG_0749 IMG_1308

Well apparently the apple didn’t fall far from the tree… because when I went to measure my LO for some cute Winter Wear Aviator pants, I shared about them here in this post …  his measurements all hit a size 2… but THAT BUM was a size 5! UH-OH! ha ha ha ha… so I flat measured the bum area to see how much ease the pattern had… I decided he did need more room then the size 3 had… so I went to work doing a full butt adjustment for my not quite 2 year old…I thought kids were easier to sew for?????

IMG_6900 IMG_6928


I had lots of inquires about a more detailed blog post, so I thought I would share his… it is the same on any size pattern 🙂

It is a really quick and simple adjustment!

Take your back piece and splice it across where the roundest part of their/your booty is.  usually about mid rise on younger/athletic builds 🙂 You will want to leave the seam allowance! Here is a picture of his:

IMG_6879

Now when you go to cut, you will spread out the back rise however much you need to add for the bum… I added about 1/2″ to my LO’s after flat measuring and comparing to his measurements. 

Then you will need to “true up” the sides… since you’re adding length into the rise it wont match perfectly anymore, neither will the outer leg seam… Here is where you can customize your fit even more…

 IMG_6880

For my Little Guy who still has a baby figure I didn’t want to loose ANY width on the waist or high hip… so when I “trued up” the outer leg I took the outer edge and added slightly straightening the line up.

When I adjust for myself, I have a small high hip and waist… so I don’t mind taking the inner angle and loosing some width up there.

(Looking back I should’ve taken another picture with a chalk line describing these… I will add those when I need to adjust a pattern for myself, or my little one!!)

I hope this helps those blessed with big bums! 😉

Petite and Tall Pattern Adjustment Tips

So… I’m tall… I mean… I’m TALLLLL 🙂

5’10” no shoes ha ha ha See me towering over my tiny mom?

10271502_10101467547479973_2882136477492759705_n

It makes finding RTW clothes a CHALLENGE to say the least… yes, I can pay an arm and a leg for “talls” but I want young trendy clothes!! So making my wardrobe is so rewarding for me!

So here are some tips for adding, or taking away length to a pattern for an adult… I’ve already posted how I like to do it for children here. But this method doesn’t work well for adult patterns, because all the sizes are made to fit an average height adult– for women most patterns are 5’6″… The “rule of thumb” is to add/take away 1/2″ for every 1″ that you are “off” the avg height drafted for.

So here we go!

Just like children’s patterns I DO NOT recommend only adding to the bottom hemline… it will make the overall garment longer… but it will not give you a great fit. If you are shorter or taller you need to add/take away length throughout the whole pattern!

This is my newest pattern the Pumpkin Spice Dolman as an example.

This is my pattern piece all taped together normally.

IMG_6874

Knit patterns are much more forgiving in fit… with that being said, the four places I recommend adjusting are: at the shoulder/armscye… just under the bust line… and just under the waistline… and at the bottom hemline

Adding throughout the pattern helps keep the bust, waist and hip where they actually hit you 🙂

Now this is my pattern piece ready to be adjusted—my patterns are no trim pages, so I can simply not over lap as much to add length—for petit you would overlap more to take length away.  I have made myself enough clothing to know how much I need to add to MOST patterns designed for average height– I add about 2 1/8″ to every shirt I make myself… 2 5/8″ to tunics…I even know how much I like in each spot– shoulders a scant 1/8-1/4″, chest and wasit area 3/4-1″, and bottom hem 1/2-1″.

IMG_6875

Here are two pictures showing how you can achieve this:

IMG_6877 IMG_6878

The shoulder/armsyce can be done a couple ways– I like to take a smaller seam allowance there to add some length…   You can also splice your pattern straight across where the armsyce is and spread your pattern… I only add about 1/8-1/4″ to mine, but that tiny difference makes SUCH A HUGE difference in how a shirt fits me!

For the chest and waist you can only do with overlap patterns like mine, I simply untapped it, and moved them down, adding what I needed, and retaped that section.

Or you can (with any pattern)… splice it straight across and measure what you’d like to add.

Shortening is the same method, you would just be overlapping instead of adding.

Now all you need to do it cut out and “true up” the sides… since you’re adding or taking away length the sides will not line up perfectly… you will just match them up and straighten them out with your new length.

Repeat process for the other pattern pieces 🙂

Ta-Da!!!! Now you have a shirt that will FIT you! ALL over! 🙂 I could never find this at the store that would actually cover my booty!

IMG_3420 IMG_3434 IMG_3476

This hasn’t been the cutest blog post, BUT I hope it helps you fit your body shape better, so you can enjoy making yourself some great fitting clothes!! 🙂

Boy Bundle Up!

10462459_10203577575173734_8733384568146067586_n

Is everyone getting excited about the next Bundle Up? I know I have been excited about it since I heard plans of it ages ago!!

Link: http://www.bundleupsale.com

I have the Lumberjack pattern in the bundle up: It is a traditional button up shirt with collar, but also has a few more options like hood and full lining. My Little One will be wearing these all fall and winter!

listing pictures1  listing pictures3 listing pictures4 listing pictures5 listing pictures6    listing pictures10

But here are some other Bundle Up patterns I had the time to whip up!

First up is the Aviator Pants by Winter Wear.  They are a knit pant with optional triangle accent pieces on the bottom leg, front slit pockets, back welt pocket, and a shorts cut line.  They were so quick to make and knit, which of course I LOVE!

IMG_6995

Okay, so my little one has mama’s backside 😉 He measured much larger for his hip/booty measurement then all the rest… SO I went to work doing a full butt adjustment…for my not quite 2 year old! WHAT! But I’m glad I did because they fit great… look at that little round tushy! 🙂 I took a few pictures and I will get another post on how to do that!

Suzanne over at Winter Wear did a great job keeping her pattern easy to use with all the cutting info on the pattern pieces (love that!). If I’m honest I put them together without reading her instructions, but I’m sure they are fab!  I love knit patterns for boys…for our photo-shoot, I took him to be in his element… OUTSIDE!

IMG_7072IMG_7079-2

And in these knit pants and shirt he could run (away from me!) and play freely and comfortably…and still look adorable!

IMG_6928IMG_7071

The knit shirt is my Deep Sea V-neck… I did a contrast camo sleeve and free-hand deer applique. My husband LOVED this outfit! Little One LOVED sticks… ha ha ha!

IMG_6909IMG_6929

He could climb, jump, bend over, and I didn’t have to worry about a stiff waistband being uncomfortable for him. I know lots of beginner seamstress have a little fear of working with knits, but I jumped RIGHT into knits when I got serious sewing! I knew I wanted my little one to be COMFORTABLE! Make the jump ladies! You’ll never look back!!! 🙂 IMG_6911IMG_6918

Okay, now I really tortured my son, but I made him model this, oh so cute and trendy, long sleeve pull over in the 100 degree weather… But look how cute he looks in it! This is Greenstyle’s Shawl Collar Pull-Over in the Bundle Up.

Again, it is knit… super quick sew and soft and cuddly! I used a super soft sweater knit and some ribbed knit.

IMG_6966IMG_6936

I made him a size up, because it wont be cool here until Oct/Nov, but he will be ready! I really love the no trim pages for Greenstyle’s new patterns! Since I’ve started doing mine like that, I’ve gotten pretty spoiled to it! I printed out my V-neck to assemble and HAD TO CUT THEM! Ha ha ha, which reminds me I need to go back and update those patterns with no trim pages! 😉

 IMG_6951 IMG_6965

I used a toggle button on the lower part of the collar… I think it gives it a great touch since I used a solid muted sweater knit. I really loved how it turned out…and so did my mom! Which is always a plus to hear compliments on something you made!

  IMG_6967 IMG_6970

Okay…I HAVE to share… I snapped “a few” pictures of my adorable dad with my little one… he came with us to model, because he’s the sweetest dad/pops ever! It’s SO much easier for me to get some shots of him when somewhere else is there! I mean… aren’t they CUTE?!?!?!!

IMG_7054IMG_7064

My son ADORES my dad! I had a hard time not making every. single .picture. black and white because I just thought they were so sweet! ❤

 IMG_6976 IMG_6980

He was having so much fun with his Pops throwing rocks into the creek!

  IMG_7018 IMG_7020

I think the adoration is mutual too 🙂 

 IMG_7024-2 IMG_7035           

Thank you for coming with us Dad!

Here is the link to go get your BOYS BUNDLE UP! 🙂 I’ve made 3 so far, but I have the Sleepy Bear PJS by Ellie Inspired already printed, taped, and cut! I just ❤ sewing for my Little Guy! Don’t leave the boys out!!!

http://www.bundleupsale.com

10462459_10203577575173734_8733384568146067586_n

How to mash sizes to create the perfect fit!

Do you have a tall skinny minny? Or a little one who needs a bigger width then their height? This is a simple easy route to mashing sizes for children to get a better fit! No more just adding to the hem!! If your child needs length they need it throughout the whole garment, not just the hem! And vice versa if your child is shorter they need it shortened throughout the whole garment.


So here is the quick guide. You will take their overall height and match that to the size chart of your pattern… for this example I’m going to be using my niece who is 44″ tall- which matches my size 5.  Her chest and waist match a size 4. So I will be using the width of a 4 and the length of the 5 on every pattern piece!

**I’m going to note in here too that going more then 2 sizes is very hard to keep the proportion and shape of the pattern.

Here is a picture where I highlighted the size 4 and 5 (Size 4 in yellow and size 5 in orange). I don’t typically do this, but I did to help illustrate 🙂

IMG_5433

And here I drew in black to show how I followed the size 4 width overall on the piece and the size 5 length.  See how I made the armhole the size 5 length, and neck hole… these are places where your little ones fit will drastically improve with this method!

IMG_5435

And again, here is the sleeve with a 4 width and 5 length. Make sure you keep EVERY piece the same length/width and your pattern will fit together beautifully 🙂

IMG_5436

Coming from a very tall girl- if your little one needs added length they will be so much more comfortable with that longer armhole/neckhole/bodice!! I can hardly wear shirts that I don’t add that 1/8-1/4″ at my armhole… even though it seems like such a small adjustment it makes such a BIG difference in my fit! 🙂

This method can also be used with a shorter length to width— I used to do this for my little one when he was younger– he is big for age so he was in toddler sizing with a baby figure! He needed a much bigger around then his height and it worked wonderful for him!

Now go create that perfect custom fit!! 🙂