Dive into Swimsuits

Swimwear week- bloggers designers Talented bloggers  you've never made a swimsuitPrizes!

It’s my turn on the “Dive into Swimsuits” blog tour hosted by Coles Creations! You can find all the blog posts and enter to win prizes over at Cole’s page!

I love making my little guy swim trunks, they’re quick and easy and so much more comfortable then the store bought with those itchy netting panties (WHO thought those were the answer???)

10488311_10152282667058214_9048176137652269596_n10509702_10152282667323214_5187630289628509110_n

These are my pattern, the Swashbuckler Swim Trunks and my FAVORITE feature is the boxer brief style lining pieces…SO much better then those netting panties! I would always cut them out of his before he was potty trained. Then once he was potty trained I thought he needed some lining and support under there, but no way were those netting panties the answer!

I have a great picture of the boxer brief lining piece, BUT for some reason my wordpress wont upload it today!!!! 😦

IMG_5458IMG_5473

I use either swim lining or a swimsuit fabric (nylon spandex). I love to coordinate the lining piece to a matching rash guard! Of course I don’t have any finished modeled pictures of that (and no one else will likely see the lining piece) but I love it!

I get asked a lot where to find the fabric for swim trunks.  You can grab a remnant or scrap piece of swim fabric or lining for the boxer brief lining again, you’ll want a nylon spandex 4 way stretch swim knit.  For the main shorts you can use “boardshort fabric” as some shop labels it (top skull print was labeled this from Funkaliicious Fabrics), “woven supplex” is a thinner version (great for super hot climates- the tricolor here is woven supplex from Chez Ami, who have since gone out of business.) I also know the Fabric Fairy usually has some in stock as well as Rockywoods Outdoor Fabric also carries it.

IMG_5461IMG_5484

And of course sewing always provides you with the ability to give your little one the perfect fit if they need a different width to height ratio and don’t fit into the “average” sizes.

IMG_5465

I hope you dive in this summer and make some swimsuits! Have fun!

Designer’s Swap

I hardly ever have time to sew up other designer’s patterns, but I’m always wishing I had more time to!

So, I loved the idea of this designer swap! I could sign up and have a deadline to “make” me finish 😉

10382167_813201762096592_3349078359874250572_n

Here is a link to the original announcement along with sales by the designers that participated (pssst Patterns for Pirates has a coupon code there! 😉 )

We are also doing a giveaway, rafflecopter posted at the bottom of the page! 

I got assigned the California dress by EYMM, which happened to be one of my very favorite designs in Kymy’s collection!  And she put it on sale-  code: californiasummer will save 25% off the Women’s California or Girl’s California or the California Bundle good April 20 through 27 at 11:59pm PDT at http://www.eymm.com.  It’s a simple dress you could do in a ton of different looks/fabrics and wear all spring, summer, and fall long! She always has a ton of options that wrap up in a quick easy sew!

il_570xN.626626220_dx7s il_570xN.626736839_as12

I went with two fronts so I didn’t have to worry about bra straps 😉 These suckers aren’t staying up in a strapless anymore!

11174422_10100306631027707_5979736855787993_o

I really wanted to somehow squeeze out a maxi out of my 2 yds, although the pattern called for 3.5 yds.  So I had to do some modifying! I spliced the pattern along the casing line and added a little to the front bodice only to make up for my chest size.  Otherwise this style always ends up blousing in the back and not in the front on me! I’ve always thought it was one of the easiest styles to alter for a full bust!

11136228_10100306631002757_6947367550955224954_o11154933_10100306630638487_729926160472901635_o

I also cut the skirt pieces much less full to accommodate my tiny yardage! I knew it would be too tight to comfortably walk in, so I did slits up both side seams to the “above knee cut line” on the pattern. The lighting here shows off a little more then usually, lol… the fabric isn’t see through at all in person!

11162037_10100306630369027_6457652057315584012_o11174634_10100306630498767_6789779450964393256_o

I love this style dress for the spring, summer and fall… so easy to throw on and look stylish! I can chase my little guy around in it without worrying about showing anything 🙂

11174256_10100306630104557_3239395190234372115_o 11146430_10100306630099567_3671446381715494936_o

I had a great time sewing this up and plan on wearing it lots!

Giveaway:

https://www.rafflecopter.com/rafl/display/924f94de33/

Boys Can Wear Pink- the Handmade Boys Series

10403212_10203606554227703_5404214825045129306_n

I ❤ the Handmade Boy Blog! Kelly makes the CUTEST clothes for her son and daughters (and sometimes even herself when I can talk her into it 😉 ) She is the sweetest; always going above and beyond for me testing patterns and even trying to help me with photo tips!  So when she told me she was doing her first series I could never turn her down!

Boys Can Wear Pink!

10373803_10203669746407468_16103805812955764_n

To be honest, I’ve never put my little guy in pink before… I’m not a huge pink lover…I tend to always go with greys and blues for myself, my husband and for little guy! Boring, I know… if you could see my fabric stash, it is pretty dull! I also tend to dress him like a little macho man in camo, dinosaur, anything you would label “very boyish”…So, this really pulled me out of my comfort zone to design and make something for him with pink!

I decided to go with a classic “pirate/sailor” look and theme to help me get inspired…since I love this look and theme! I went with a white and pink stripe I got from my local Hobby Lobby, in their spring collection. In person the pink is almost neon.

IMG_1477IMG_1529


I knew I wanted the oh so classic “Mom” heart tattoo on it as well (just pink instead of red).  I struggled on placement! But in the end I went with the shoulder, where a tattoo would be and I’m so happy with it!

IMG_1569 IMG_1527 IMG_1483 IMG_1416

I added an iron on transfer of a black anchor to the front right side to help fill and even it out overall.

IMG_1423 IMG_1455 IMG_1521 IMG_1544 IMG_1550

I paired it with his Cpt. Comfort Jeans that are distressed and bribed him to wear the black tennis shoes (instead of his Woody boots that he wears EVERY DAY!!!) It took a piece of candy and going outside to play to get them on!

IMG_1570 IMG_1464  IMG_1461

His hair… oh my… he woke up with the most wild hair ever that day… So I tried to put a little gel in it to calm it down and it didn’t help much! But it kind of fits the sailor look right? Wind blown? We’ll go with that 😉

IMG_1452 IMG_1434 IMG_1429IMG_1461

In the end I love the bright colors on him… it fits his wild, rambunctious personality so much better then the greys I usually go for! (Although, I tend to be quiet and shy…so I’ll stick with my muted tones for myself 😉 ) I am going to try to add more bright colors into his wardrobe for sure! Thank you Kelly for having me in your series!! ❤

IMG_1634IMG_1655IMG_1675 IMG_1670   IMG_1635  IMG_1621  IMG_1482 IMG_1462

Now you can participate too!

10451056_10203685980053299_4539772564669910279_n

Prizes:

One yard of http://www.mabelmadison.com/pit-stop-pink-stenzo-poplin.html Stop Poplin in pink http://www.mabelmadison.com/
$25 gift certificate, plus a surprise fat quarter from https://www.etsy.com/people/phatquarters?ref=pr_profile
One yard of solid cotton/lycra & one yard of coordinating fabric from  https://www.facebook.com/pages/Purpleseamstress-Fabric/135198749843668
One pattern of choice from http://www.paisleyroots.com/
$20 store credit from http://peekaboopatternshop.com/
One pattern of choice from Patterns for Pirates http://www.craftsy.com/user/3301275/pattern-store
One pattern of choice from  http://www.welcometothemousehouse.com/shop

Bottoms Up Pants Pattern from http://ifonlytheywouldnap.net/

One Pattern of choice from http://www.titchythreads.com/patterns

Tips and tricks of upscyling Jeans!

Making jeans can be a little intimidating for some… and we’ve already had a post here about making jeans look more like store bought jeans with details like top-stitching thread and distressing.

But, a really easy way to get your jeans looking professional is to use an old pair that an adult is throwing/giving away! This means a lot less work for you distressing and top-stitching if you’re smart about laying out your pattern pieces! So here it goes…my tips on using pre-existing jeans:

1- Making a few cuts along the seams can really make cutting your pieces much easier! I like to cut along the inside legs/crotch, cut off the waistband and beltloops, and the back pockets.

IMG_9003IMG_9001 IMG_9004

2- Be cautious about distressed/washed jeans and laying out your pattern pieces… meaning, if your jeans have a very obvious fade/wash/distress pattern on them then you need to make sure you like where it will be placed and that it will match when you sew up your jeans. For this pair, I wanted the distressed area of the original jeans, so I laid my patterns around that.  Notice that my two pieces are very close to the same area horizontally, and that the back yoke is placed above the back piece.  All of this will ensure that the distressing and wash look natural on my finished jeans.

IMG_7758

You can also use the original hem line if you prefer to get that instead. Remember to account for hem allowance. I did that with this pair, because my jeans didn’t have a very noticeable distressing.

IMG_9000

Use the back pockets when cutting your new pockets, Remember to account for the hem allowance at the top.

IMG_9005

If you’d like to use the waistband and belt loops you can…. but warning, unpicking those belt loop stiches is not fun 😉

If you pattern calls for elastic in the waistband, like my Cpt. Comfort Jeans, then you will have to cut a slit on the wrong side of the waistband to slip your elastic through- I just use a wide zigzag to mend the slit after (I hide the zigzag stitches behind a belt loop!).  Make sure when overlapping that you line up your jeans button and button hole, you can see here on mine they overlapped much more then the pattern called for.  Then you will tack down the bottom of the belt loops 🙂

IMG_9006IMG_9012IMG_9213

3- Now that you have your pieces cut you will continue to sew them just like the pattern calls for  matching the store bought top-stitching thread as best you can. And although they have a wash and distressing, I STILL distress along the way! That way my finished jeans will have the distressing where store bought jeans do, like along pocket lines.

IMG_7260 IMG_9009

IMG_9010

Now you have a great fitting (no plumbers crack!) pair of jeans that cost you nothing but the thread and time ❤ and plus they look amazing!

IMG_9218   IMG_9422IMG_9403

Make ready to wear looking jeans!

Jeans can be an intimidating sewing task, but they really aren’t that difficult and it is so great to have well fitting jeans for you or your little ones! No more plumbers crack when bending down!!!!! 😉

IMG_9403

With my recent release of the Cpt. Comfort Jeans I wanted to post about how to distress your new denim to look more like ready to wear jeans! I personally LOVE the distressed look! Although a super clean dark denim can look nice as a “dressy” pair of jeans like here:

_DSC4859

But for everyday, I just love the little distressed look… something about looking like Daddy gets me every time with my little guy!

So, lets get started on those great store bought look jeans!

You really MUST use a top-stitching thread for all your top-stiching if you want store bought look… I scoffed at my Mom the first time she told me it was a must… BUT she was right, like always!!

IMG_7260

You will use this heavier/thicker weight top-stitching thread in the top only and for top-stitching only. You will use regular thread in the bobbin and for all seams sewing the jeans together– yep, you have to rethread a lot ;). But it is absolutely worth it if you want ready to wear looking jeans! I promise!

You will also NEED a bigger needle designed for heavy weight fabric like denim or you will be breaking needles on those thick belt loops!… here is a single and double needle:

IMG_7259

Now, I only have one machine, so there is A LOT of switching threads and needles if I use the double needle. So, I will often just sew two lines with my single needle instead of switching to my double needle 😉

Now for the distressing, you will need some sandpaper! To be honest, I’m not sure the BEST kind of sandpaper to use… I asked my husband if he had some and used whatever he handed me 😉 Here is a shot of the kind I happen to use!

IMG_9008

The trick to distressing your denim is to do at WHILE you’re sewing the jeans! If you try to do it before it’s hard to gauge where the distressing needs to be. If you do if after you’ve top-stitched them then you will be breaking your top-stitching threads (ask me how I know that one 😉 ) see left top pocket with it’s broken threads :/ oops!

IMG_9422

So, I suggest sewing the jeans together with your normal thread, then distressing with sandpaper before you top-stitch. Here is my patch pocket sewn, turned right sides out, and distressed along the edges (and any other places I fancied at the moment). Then I top-stitched.

IMG_9010

Some areas are harder to distress before topstitching like back pockets, belt loops, any piece that you are top-stitching closed or onto the jean.  But I still follow the same steps.  I just fold and press, distress, then top-stitch onto the back piece.

IMG_8998

So have fun with a little distressing or A LOT! lol! I like a lot 😉 I end up with a mound of blue fuzz all my sewing room by the time I’m done!

Last is the button! I love to use “real” jeans buttons- and honestly, I always have been lucky enough to take them from my loving mother’s stash! But they are very easy to put on, just line up the two parts and hammer away! Yep, you’ll have sandpaper and a hammer in your sewing room for jeans!!

I’ve always used snaps, which are very common on ready to wear for younger children 🙂

IMG_9000 IMG_9218 IMG_9245

Sophie Sew-A-Long show off!

There were so many GORGEOUS Sophie dresses made over in the M4M fb group.

Let me show off a few….

Made by Brooke from Five Little Monkeys. Brooke used a knit bodice! How comfortable will that be. She cut the back bodice on the fold, so no closures necessary.10610697_845115068872530_8419293730610722080_n

Made by Megan who used the sweetheart center panel with a lace overlay, exposed zipper and some Ikea curtains for the tulle overlay! 10372785_10107571677773934_8261478764356685823_n

Made by Virginia from Banana Showcase! I love the rick rack detail she added to the center panel.

10409681_765929283482197_3357895561692910184_n

Made by Alison from House of Haddie. Alison used the ruffle sleeve add-on from the sew-a-long and added a sash.

961550_10104341550095620_1659017370_n

Made by Amanda with matching dolly dresses!

FullSizeRender (1)

Made by Alexandra from M & M Bows!

10387202_594998653938264_1862516396779928076_n

Made by Heather from All Things Katy! Heather used the sweetheart and ruffle add ons. I adore her buttons too!!

1452312_10154791706015394_9124105686174277935_n 1505285_10154791707720394_2627763430470626267_n

The Sophie is PERFECT for appliques and embroidery! Made by Jessica from JAB Creations. Jessica added a sweet overlay.

10815790_10104914874094779_1840522226_n

Made by Karen for her sweet daughter!

10700475_10205320866127295_3934349811820391325_o

Made by Christi from Abble Dabble Boutique.

10356162_10204073947982559_601071077922262454_n

Made by Lauren who hand embroidered the sweetheart center panel!

10352578_706594663292_4273333843013072993_n

We had a fantastic prize donated from Bethany Lane; 1 person with the most ‘likes’ in the finished dress sew-a-long album will receive 2 sets of ‘I love you’ buttons! Bethany Lane also offers adorable personalized buttons that I just adore. Get your shop’s name or daughter’s for a special touch to any outfit!

I_Love_You_Wood_Button_-_Coffee_large unnamed

BUM BUM BUM, NOW for the winner…. I gasped when I saw this adorable dress! Made by Lorraine from Buttons & Bows!! Isn’t is beautiful and guess what?? Lorraine made it for her shop, it is a size 3 and for sale! If it was my daughter’s size I would snap it up, so cute!! Congrats Lorraine!!!

10155129_10154814126695092_7437906604619503236_n

Thank you SO MUCH to all the ladies joined and made my first sew-a-long a success!! I hope you join us next month for our next sew-a-long!


Sophie Sew-A-Long!


10389614_10100219308891967_958182121678056481_n

We are sewing the Sophie dress together over in my pattern group on fb! Come join us! Even if you can’t sew up your dress this week, there are lots of additional add ons, tips, tricks and even videos to help you along the way. I am adding the videos the my new YouTube channel if you ever need to reference them.

Monday we chose our size and fabric, cut out our dress and embellished our bodice. You should see all the creative, beautiful choices everyone is making. I just love seeing what others create with the same pattern. Yesterday we finished step 2 of the pattern, constructing the bodice. Today we are working on the sleeves and sash. I’m going to give you a quick picture tutorial on how to enclose the sleeve seam in the bodice lining. If your daughter is sensitive or you just like the inside of your dress to look pretty, this is for you. It is not difficult, but is more time consuming.

So here is your sleeve and your bodice/lining. Separate your main bodice and lining…just open along the armhole.

IMG_6827 IMG_6828

Now we are going to stay stitch along the armhole curve on the lining side. Use a 1/2″ seam allowance.

IMG_68282

Then clip to, but not through the stay stitch line. Then press the clipped curve toward the wrong side of the lining.

IMG_682823IMG_6830

Pin the sleeve to the main bodice. Careful not to catch the lining. Stitch in place. I finished this seam out of habit, but it’s not necessary since it will be enclosed.

IMG_6831IMG_6832

Press the seam toward to bodice.

IMG_6833

Pin the lining over the seam and hand stitch in place to enclose. TADA beautifully enclosed sleeve seam! Let me know if you give this a try. 🙂

IMG_6834 IMG_6835 IMG_6836

Is it true to size? What size should I make??

Is it true to size?? She’s 3, so I make a size 3 right?? But I always make her a 3 in ‘such and such’ patterns and she wears that size in ready to wear. Seriously, what size should I make??

I constantly see these questions pop up on sewing boards over and over again! Choosing what size to make in a pattern is SO important!! How frustrating is it to waste fabric, time and sometimes tears on something that doesn’t fit? I want to give you some tips and tools that will help you better your sewing forever. You can use these on yourself, child, husband, dog…anyone 😉 The MOST important step in sewing up a pattern is looking and understanding the size chart.

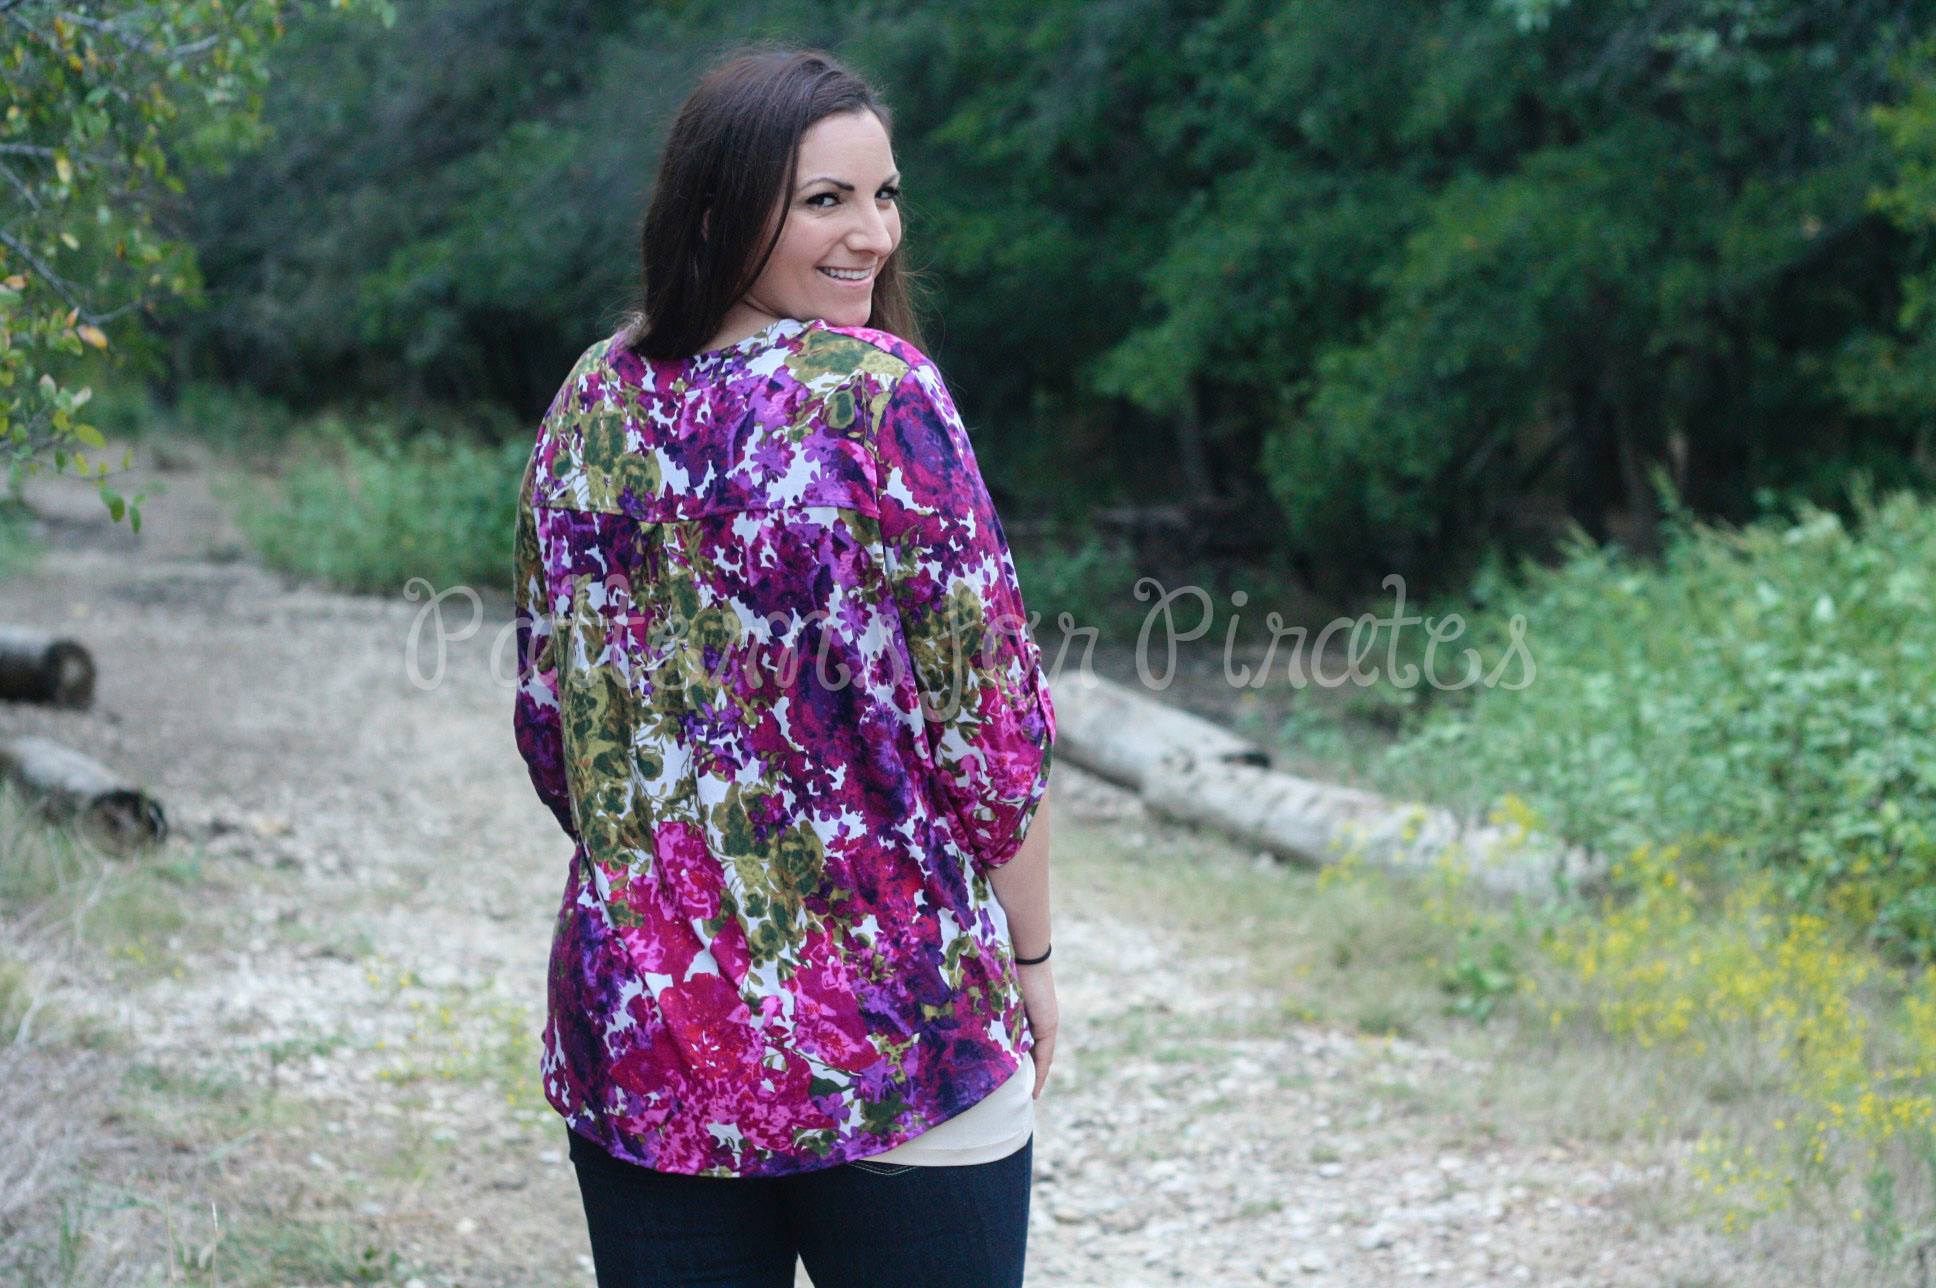
First let’s talk about true to size. True to size. True to size. I see this so much. But true to what size? Ready to wear from… Old navy? Target? The Gap? Gymboree? Ready to wear clothing fits different depending on store….I can’t tell you how many different size jeans I have. I can tell you that most pattern designers use a set of ‘standard’ measurements to create and grade their patterns. Those ‘standards’ may be from a grading book, ASTM book or from their own children. My sister’s, mom and I all use ASTM measurements. It’s a set of measurements taken from all over the body in different age ranges- infant, boys, girls, women and men. Armcyce depth, armcyce width, back to waist measurement, upper arm measurement, ankle width, waist height…. I mean TONS of measurements. We use these to help create our patterns. Designers can be using the same measurements differently. If their child is thin, maybe they size down all the measurements, so their 3 is my size 4. Or vise versa. So ‘true to size’ can be tricky. My patterns are true to my measurements. I also give my patterns a finished fit that I prefer on my daughter. For example my Hailey pants have a lower rise, becuase my daughter will NOT wear her pants high. She wants to wear her pants lower and will just pull her pants down constantly if they are anywhere near that belly button.

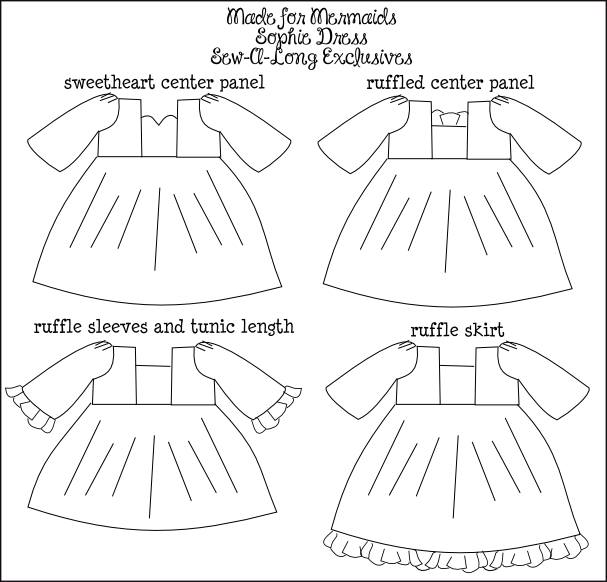
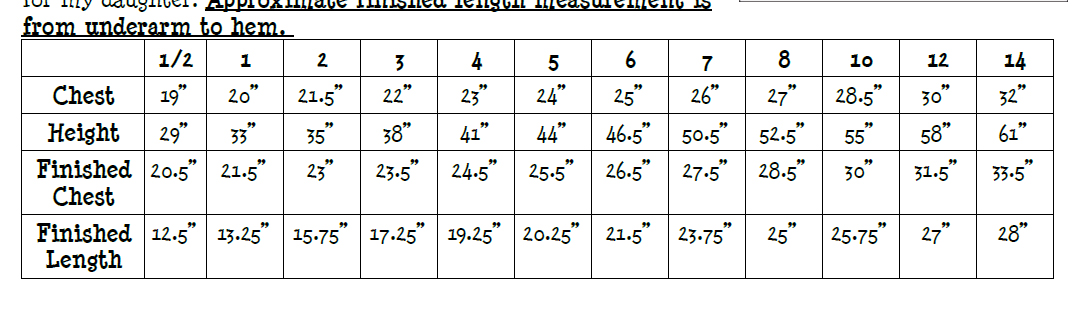
This is why I try to give as much information in my size chart as I can AND try give reminders in my tutorials when it may be a good time to fit your model. I like to give chest size and height of the child, finished chest and finished length. This is the size chart from my newest pattern, the Sophie dress.

newsize

First is the child’s chest measurement and the height. My daughter has a chest measurement of 21.5″ and she is 46″ tall. So according to my chart she is a size 2 chest and almost a size 6 for height. She is 4 years old. Now I always ‘mash’ the sizes to get a perfect fit. (My sister explained in that post). But I wanted to go in a little more detail!

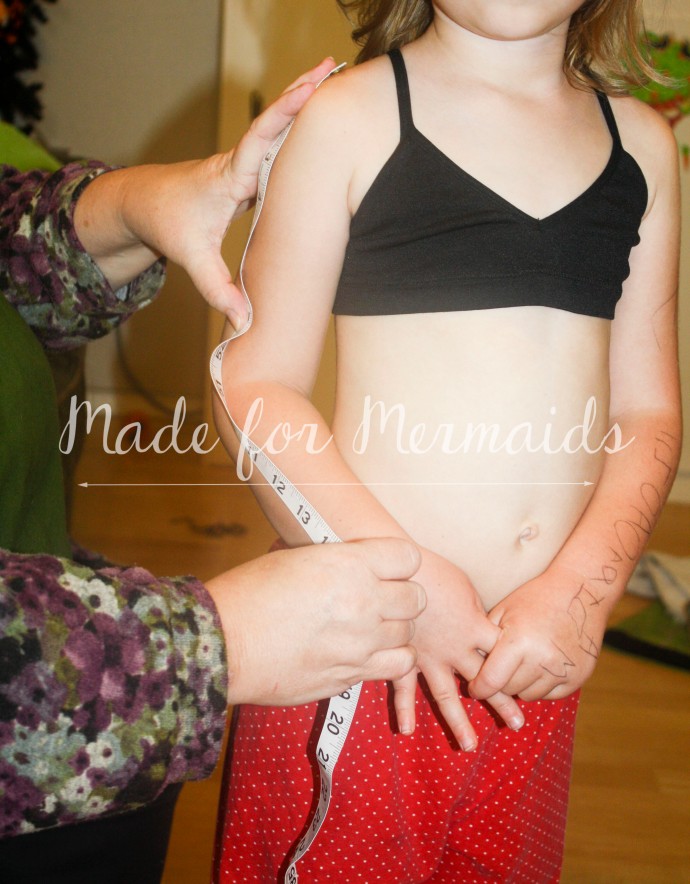
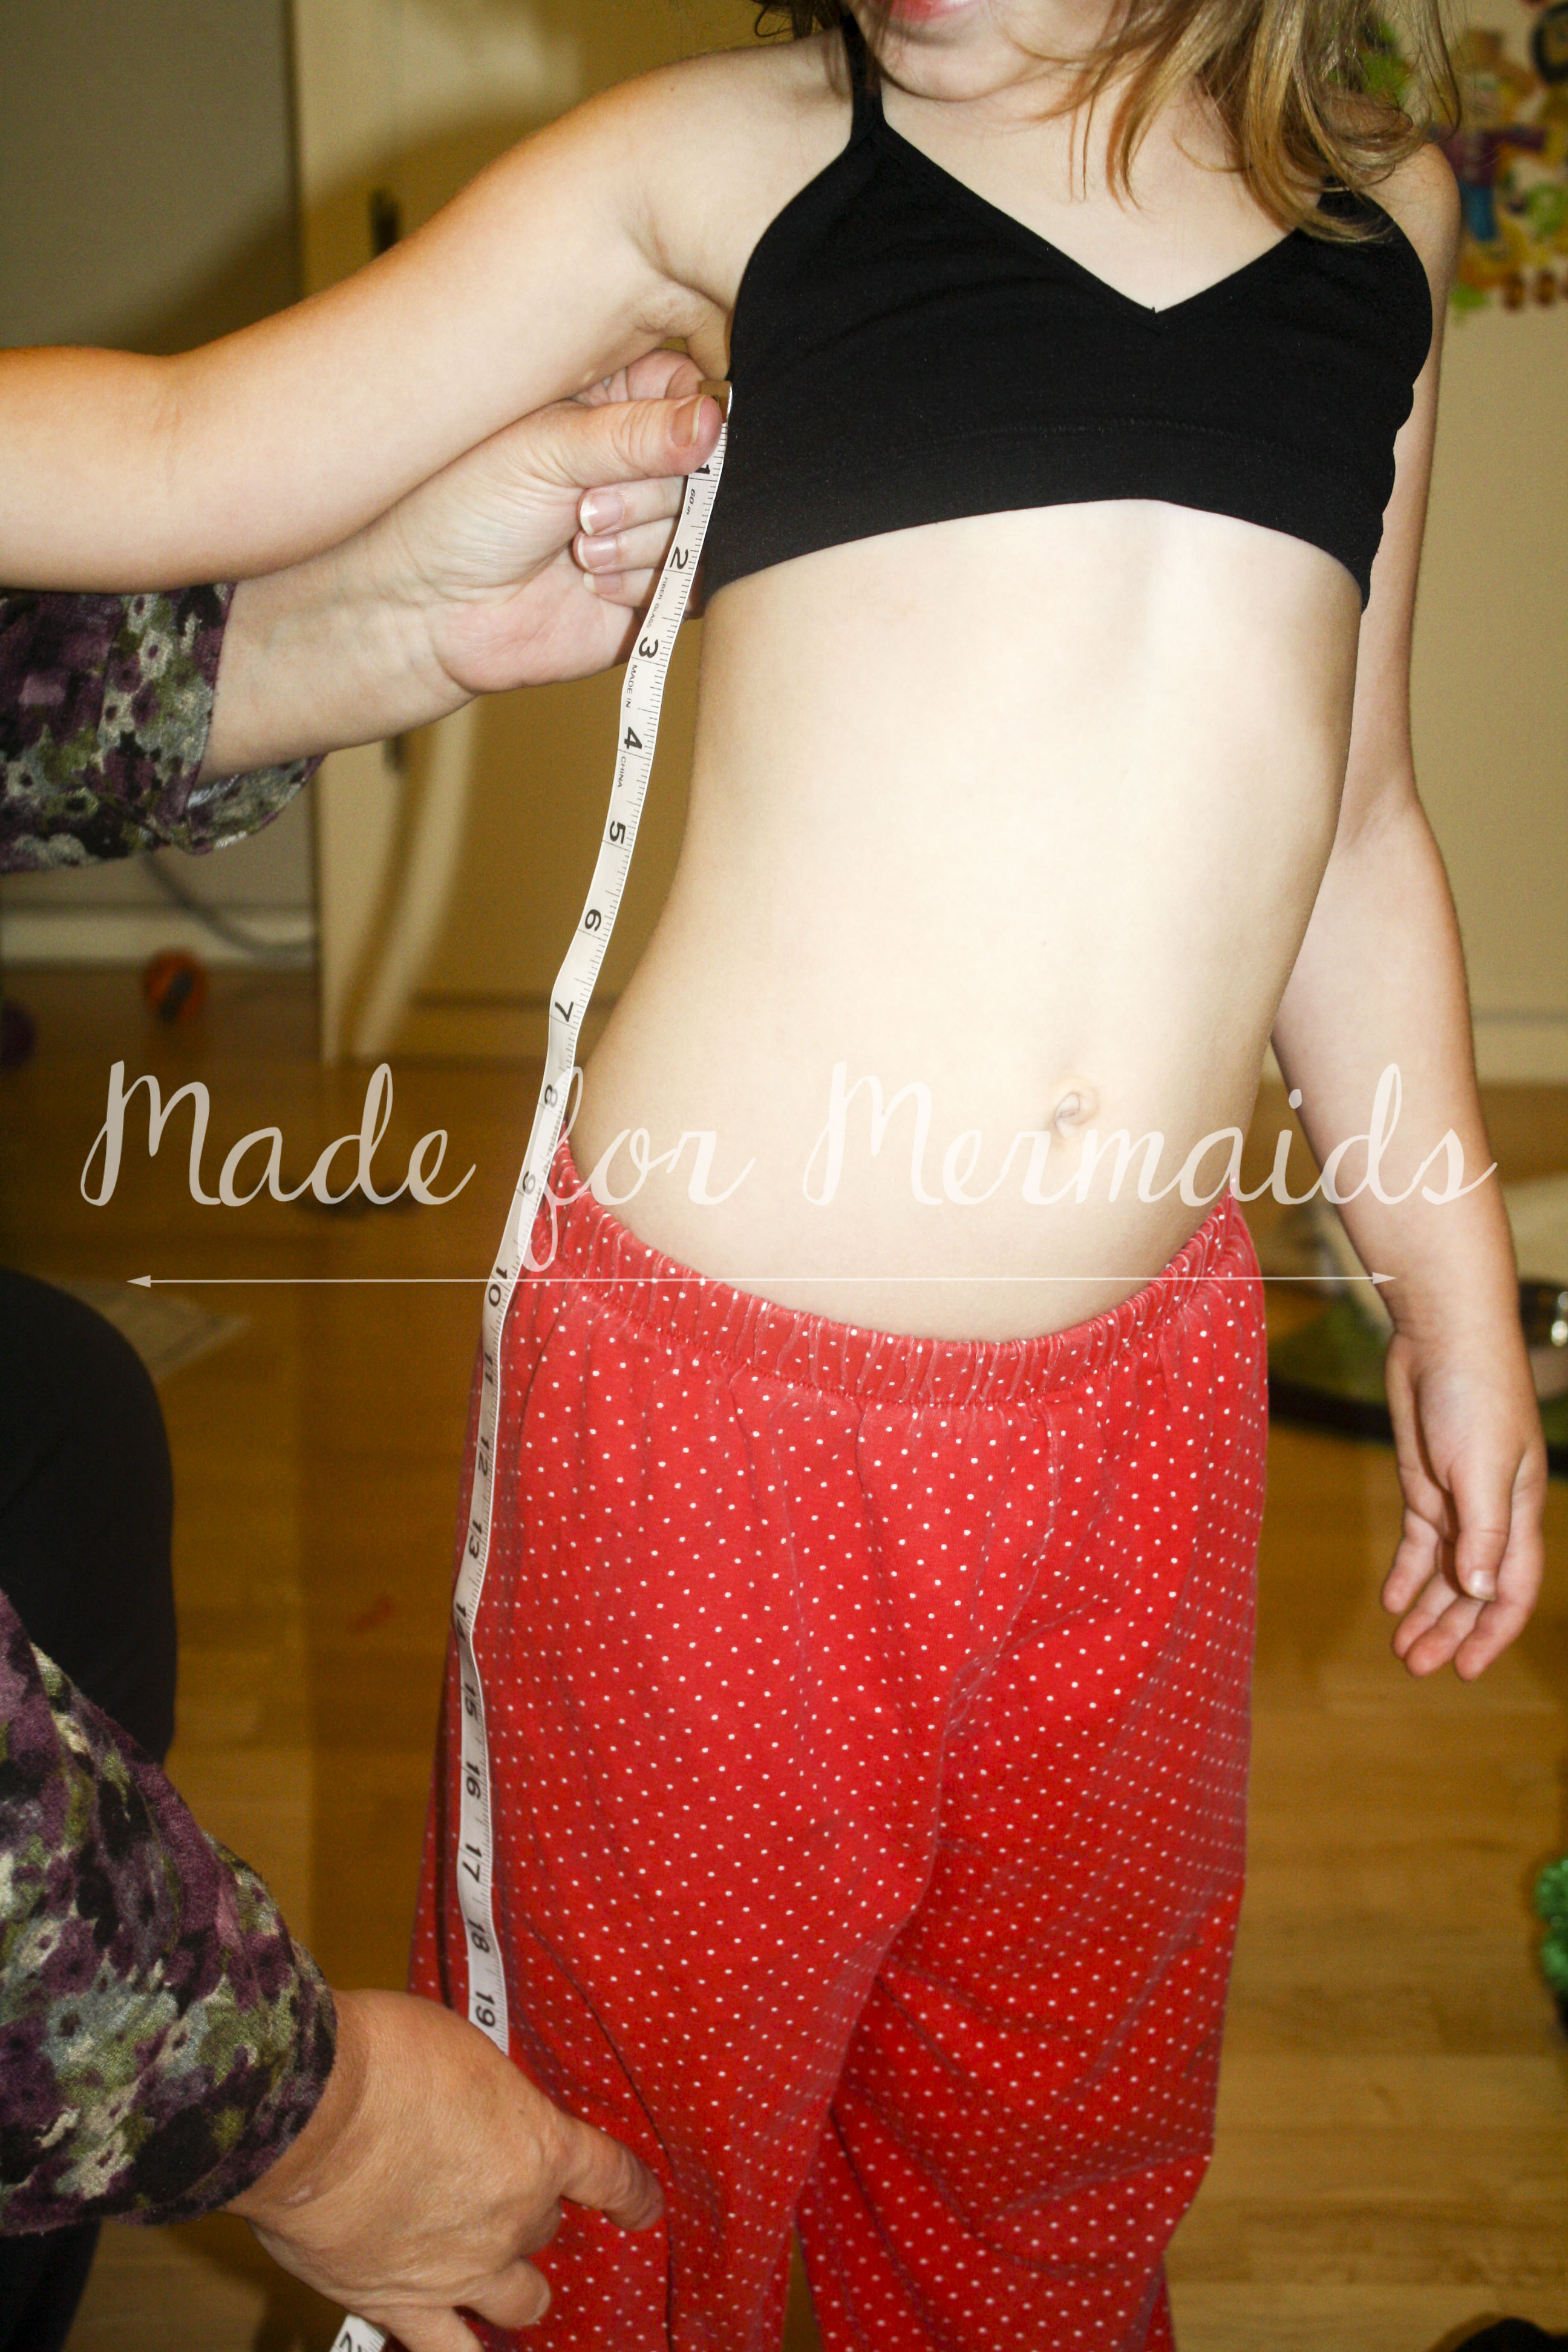
So I measure her chest. You want your model to stand straight… even if they whine and cry that they don’t want to….

IMG_6809

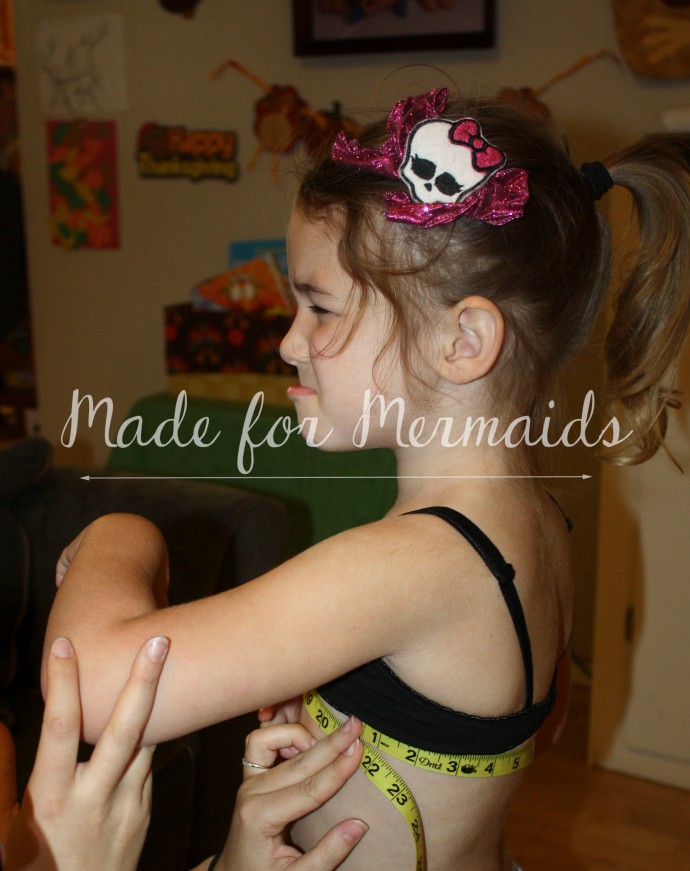
You want their hands relaxed at the side. If arms are up, you’re going to get a smaller measurement…no good! Let them stand there for a second and breath normal, no holding breath or sucking in.

IMG_6584

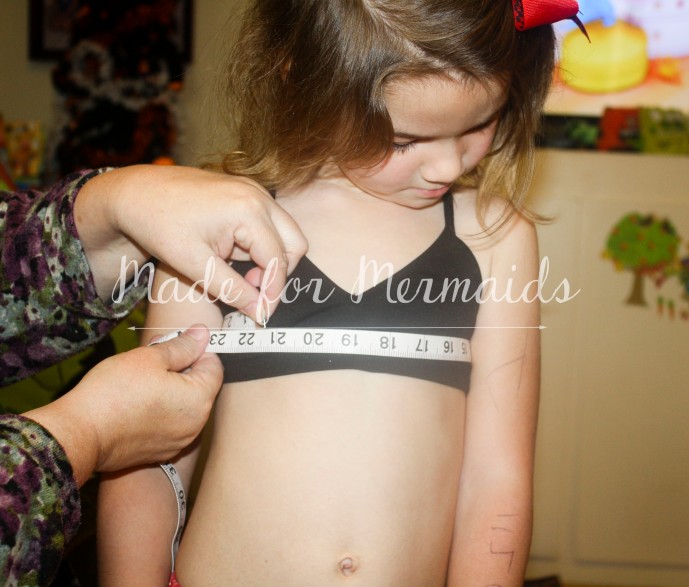
You also want to make sure the measuring tape is not drooping in the back or loose, but do not squeeze tight either!

IMG_6812

IMG_6813IMG_6585

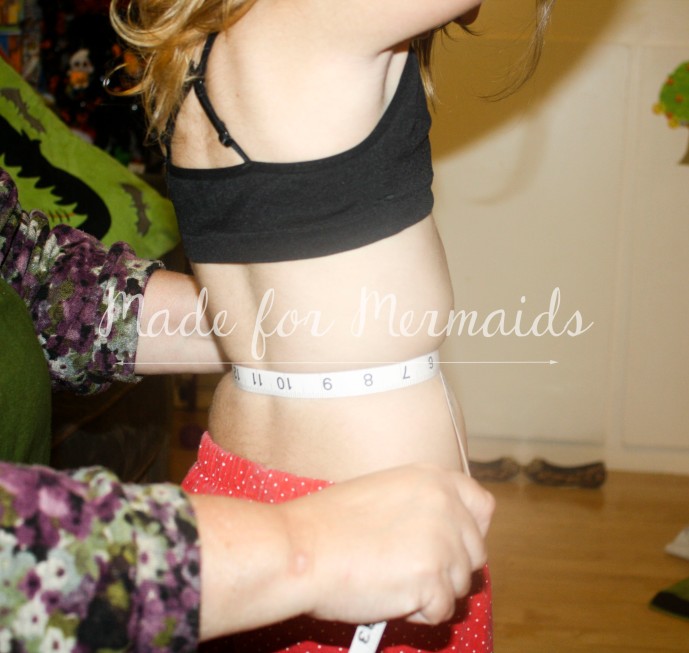
You want it nice and straight, all the way around.

IMG_6805IMG_6592

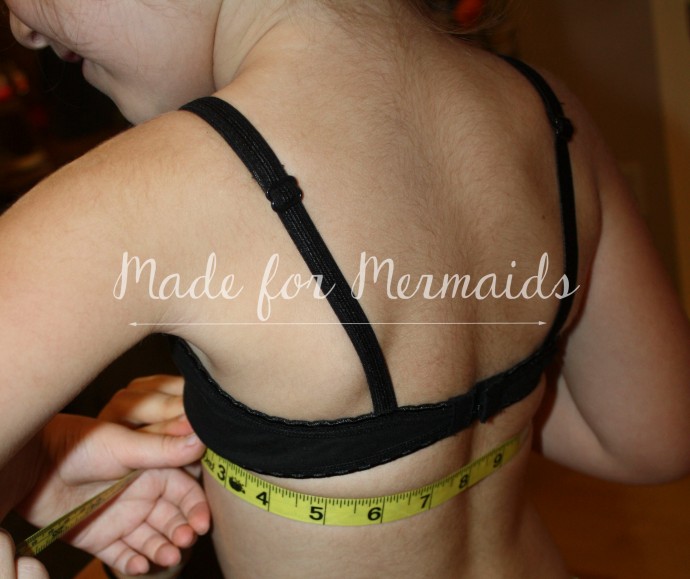
Next I look at the finished chest measurement. How much ease is already built into the dress?? What fit the designer is going for, if it’s a pull on jumper, a zip or button back, does it have sash ties…all this will play into how much ease the pattern has. The Sophie dress has 1.5″ total. That may sound like a lot, but you do NOT want a tight fitting woven dress on a child. They are not going to be able to move or be comfortable. If you think about the dress being on your model, it will have 3/8″ in the front, each side and the back. Plus this dress has ties so you can easily cinch the sides. But hey you may like your daughter’s dress a little looser. Maybe her sister and her are ALMOST the same size, or she may have one too many dresses in her closet for this season (or more like 10 too many dresses?? No?? Just us??) and you want it to fit longer. Looking at the finished measurements can help you choose what size to make. You can hold the measuring tape around your model’s chest with the finished measurement to help visualize how it will fit.

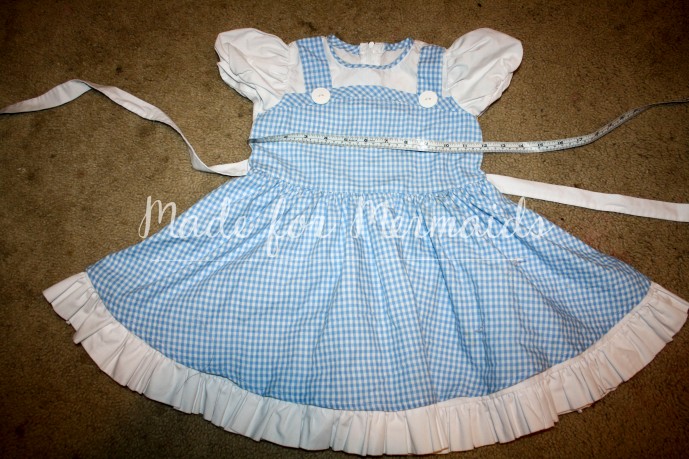
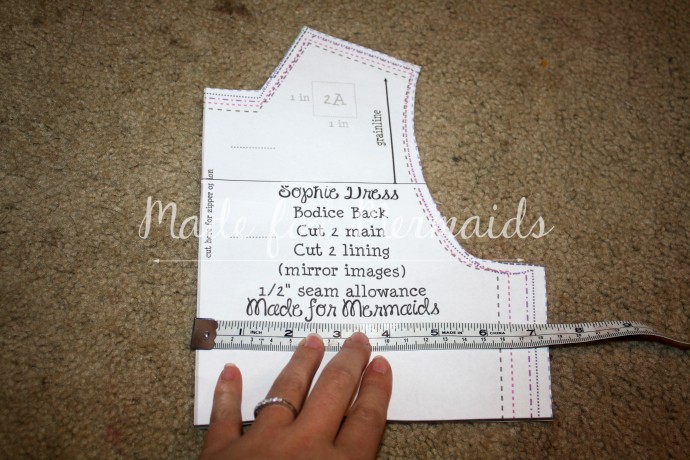
Another EASY tip is to flat measure a finished garment. Choose a dress or top that is in the same type of fabric and similar style. You don’t want to measure a knit t-shirt when we are making a cotton dress. You also don’t want to choose an elastic, shirred or pull on jumper if you’re making a more fitted, zipper or button back dress. They are not going to fit the same. Lay it on the ground flat. Measure under the arm, from one side seam to the other. Okay this dress is about 12″. 12″ flat, means it is 24″ finished (times 2 for the back).

IMG_6821IMG_6822

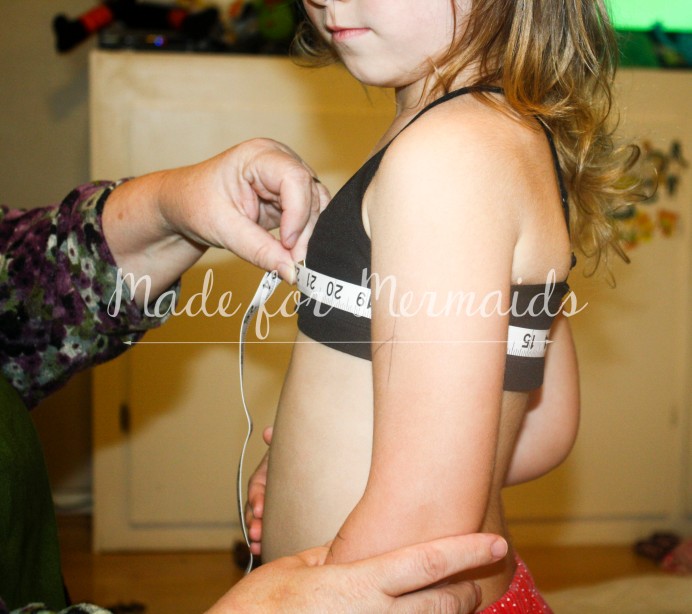
Looking at my chart, that is between a size 3 and 4.  You must also look at their height. She is almost a size 6 height. This means she has longer arms, legs, torso…she needs more room to get her arm in the dress, more ease to lift her arm and just move to be comfortable. I don’t want her to raise her arm and be stuck. Or have to wrangle her arms CRAZY to get her in the dress….you know you’ve had a dress half on you daughter and she’s screaming because she’s stuck….sorry kid!! This means I choose bigger, the size 4 for her width.

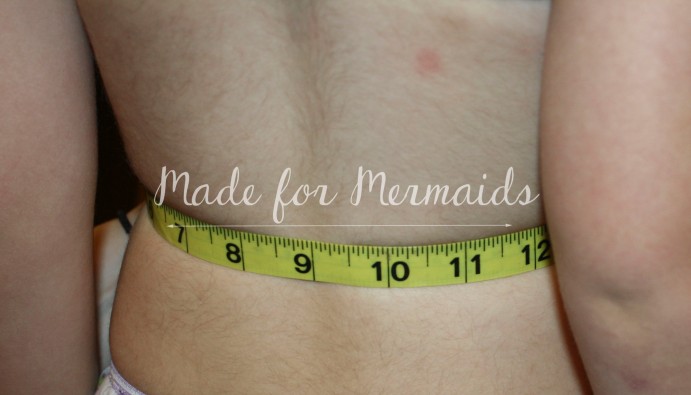
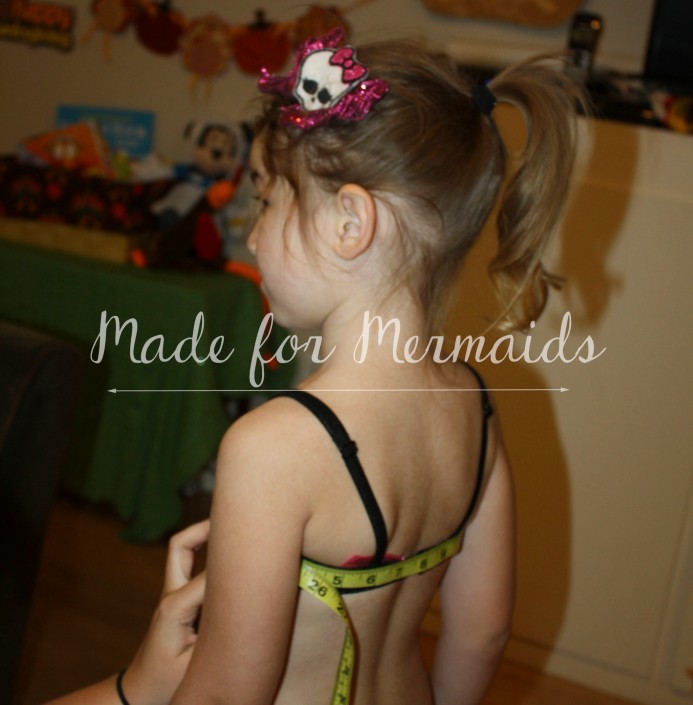
Next finished length. I like to give my finished length from the underarm to hem. I feel like it is more accurate and easier to measure than from the shoulder seam to hem.

length

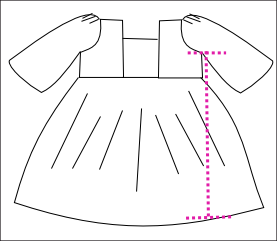
Model stands straight, raises arm slightly and measure right under their underarm and straight down. You don’t want it directly IN their armpit. The armhole is not going to be way up there! I personally usually like her dresses a little shorter. You may like them a little longer. This is easy to adjust, just a little math to figure how much to add or take away from the skirt length measurement. Or if the finished length is a little long, you can also just take a larger hem, then let it out later when she grows, bonus longer wear!

IMG_6595

Maybe your pattern doesn’t have ANY finished measurements, aw oh no! This takes a little more time, but is well worth it. You can flat measure your pattern pieces. For the finished chest, you would need to measure your front and back pieces and account for seam allowances, closures, etc. Worried the sleeve length isn’t going to be right, or you want to change it? Have your model slightly bend her arm and measure from the top of the shoulder to where you want it to hit. Then flat measure your sleeve piece from top to hem. Don’t forget to account for seam and hem allowances, my seam and sleeve hem allowance is 1/2″ each, so 1″ total. (Also I know you love my daughter’s tattoos, which her dad taught her to draw on herself….cool dad trick…)

IMG_6824IMG_6597

Last tip is to make a muslin. I know, I know, NO one wants to make a muslin. But it can be well worth it. Specifically if you’re using special or expensive fabric. To make a muslin, buy CHEAP fabric. Maybe hideous 50 cent fabric you found at goodwill or broadcloth on sale when it was $1.99 is great. Just make sure you are using the same fabric as called for in the pattern. FYI, jersey knit sheets often go on sale at Target and make a great knit muslin. You don’t need to fully construct this dress. For the Sophie dress, you really need the bodice and you don’t even need to do the lining.  Simply baste together the shoulder seams, center panel and side seams. Try on your daughter inside out and pin any areas that need adjusting. For example, maybe the shoulders are a little big, so note and instead of using a 1/2″ seam allowance at the shoulders, use a 5/8″ seam allowance. Badabim, badaboom!

IMG_6802

If  you sell your dresses I suggest listing the finished measurements so your customer can choose. Or if your granddaughter lives in another state, tell your family how to flat measure. I honestly don’t always trust someone’s measurements; kids can be wiggly, whiny and hard to measure if not in the mood.

I hope this helps someone and just maybe it makes you rethink a pattern you used and didn’t have good luck with. I promise this is all well worth the time and these small adjustments will come second nature once you start. Kids are usually not straight sizes or ‘average’. If you aren’t looking and choosing your size by the designer’s chart, you aren’t giving the pattern a real chance! If you have any questions let me know, I love helping if I can. I would also LOVE for you to come sew-a-long with us in my fb pattern group! We’ll be having a lot of fun chatting, sewing and giving away FREE patterns 🙂 Everyone could use more patterns right?? Plus look at all these fun add ons I’m offering exclusively for FREE this week!

1459172_10100218913454427_4235082042092951443_n


Megan

Patterns for Pirates and Girl Charlee- a match made in heaven!

girl charlee promo

My love for drafting great modern pdf sewing patterns for women has found a great match…Girl Charlee Fabrics!

We’re both all about modern, trendy looks! And like Girl Charlee I mostly design for knit fabrics 🙂

Here is the first Girl Charlee sponsored pattern of mine: the Everyday Elegance Top

listing pictures1

This top is perfect for everyday wear with a great put together look! The loose flowy fit is so comfortable and flattering for women of all ages and shapes! Speaking of shapes, this pattern is from XXS-XXXL… if you’d like to see it in all sizes head over to my group where you can find every size modeled and what fabric they used! https://www.facebook.com/groups/1489835597930083/

I’m wearing Girl Charlee peach skin on the cover photo, this is a soft woven fabric with a lovely drape.  It is one of the easiest drapey wovens I’ve ever worked with, because it’s not slippery! Plus! 🙂

Here I am in another Girl Charlee fabric- their chiffon.

1 (2) 1 (9)

Now SOME chiffons can be more difficult to work with, but this navy and white dot wasn’t! Although it is still chiffon, so it doesn’t like to hold a press well, it wasn’t super slippery while sewing. I LOVE this one! The super soft drape is a perfect match for this loose top!

This top can also be made is a knit fabric, which Girl Charlee is best known for! Here is my LOVELY sister in an all knit Everyday Elegance Top:

3 (1) 3 (2)

Isn’t she beautiful? Made in a soft knit, you can’t beat the comfort level of this shirt! And yet, you still look dressed nice, trendy, and even professional enough to go to work, church or out for some fun!

Some of the details on the shirt are the V front and rounded collar here:

1 (5) a (3)

That’s right ladies, no tricky placket or buttons for you to get frustrated with! All the techniques on this top are easy and quick!

The sleeves have a small gather at the shoulder seam:

a (8)

That means all your ease is in that gather–no tricky easing in the set in sleeves! YAY! Again, easy techniques!

The button tabs add such a cute and trendy look to the 3/4 sleeve, so you can wear this top year round!

4 (1)a (7)

And the longer tunic length with curved hem is perfect for pairing with leggings, skinny jeans or even your favorite work slacks! No more worrying about anything hanging out when you bend over 😉

a (1) a (4)

And last the back yoke is perfect to play with fabric combos, and the back pleat gives it the extra flowy looseness you need in the back 😉

2 (5) 5 (1)5 (2) a (6)

Not so into loose blouses? That’s okay! This pattern also comes with a quick and easy belt you can tie around at empire, waist or hips-whichever is most flattering for your figure!

1 (6) 1 (11)  9 (1)  b (5)10648830_10205104950368558_2047112295619283852_o

Oh… look at that baby bump looking oh so adorable in this non-modified knit Everyday Elegance Top!

So… since Patterns for Pirates and Girl Charlee make such a great pair we decided not only to work together with pattern sponsorship, but Girl Charlee will also be the first and only other place besides Craftsy and Etsy where you can buy a Patterns for Pirates pattern! To kick off our partnership we’re running a CONTEST AND GIVEAWAY! 1 (1)contest

Come join my facebook group to enter your change to win 3 Patterns for Pirates patterns of your choice AND a $25 gift card to Girl Charlee!

To enter you can share any items made from a Patterns for Pirates pattern WITH Girl Charlee fabrics in the designated contest album! It can be an item you’ve sewn previously or you can order now and make one to enter with! Don’t worry, you have 4 weeks to order, create, and share to win!

Winner will be chosen by all of us here at Mother Sews Best for our pick of the best pairing of fabric to pattern! There will also be one random winner for 2nd place for 1 Patterns for Pirates Pattern of choice.

Full BOOTY Adjustment tips

So in my post about the Greenstyle Taylor Shorts I made myself here … I mentioned I did a “full butt adjustment”.. well because I have a FULL butt 😉

IMG_0749 IMG_1308

Well apparently the apple didn’t fall far from the tree… because when I went to measure my LO for some cute Winter Wear Aviator pants, I shared about them here in this post …  his measurements all hit a size 2… but THAT BUM was a size 5! UH-OH! ha ha ha ha… so I flat measured the bum area to see how much ease the pattern had… I decided he did need more room then the size 3 had… so I went to work doing a full butt adjustment for my not quite 2 year old…I thought kids were easier to sew for?????

IMG_6900 IMG_6928


I had lots of inquires about a more detailed blog post, so I thought I would share his… it is the same on any size pattern 🙂

It is a really quick and simple adjustment!

Take your back piece and splice it across where the roundest part of their/your booty is.  usually about mid rise on younger/athletic builds 🙂 You will want to leave the seam allowance! Here is a picture of his:

IMG_6879

Now when you go to cut, you will spread out the back rise however much you need to add for the bum… I added about 1/2″ to my LO’s after flat measuring and comparing to his measurements. 

Then you will need to “true up” the sides… since you’re adding length into the rise it wont match perfectly anymore, neither will the outer leg seam… Here is where you can customize your fit even more…

 IMG_6880

For my Little Guy who still has a baby figure I didn’t want to loose ANY width on the waist or high hip… so when I “trued up” the outer leg I took the outer edge and added slightly straightening the line up.

When I adjust for myself, I have a small high hip and waist… so I don’t mind taking the inner angle and loosing some width up there.

(Looking back I should’ve taken another picture with a chalk line describing these… I will add those when I need to adjust a pattern for myself, or my little one!!)

I hope this helps those blessed with big bums! 😉